How To Disable Secure Boot For Legacy Device. In modern computers, Secure Boot is a security feature that ensures only trusted operating systems can boot on your system. While it’s a great tool for protecting against malicious bootloaders, there are situations where users need to disable it — especially when installing older operating systems or enabling Legacy Boot mode. This guide will walk you through How To Disable Secure Boot For Legacy Device, explaining each step in detail and providing tables and comparisons to help you understand the BIOS setup process better.
Understanding Secure Boot and Legacy Support
Before diving into How To Disable Secure Boot For Legacy Device, it’s important to understand what Secure Boot and Legacy Boot mean.
| Feature | Secure Boot | Legacy Boot |
|---|---|---|
| Definition | A UEFI security standard that verifies OS integrity before booting. | A traditional BIOS boot mode that loads older OS versions. |
| Compatibility | Works with modern UEFI systems only. | Works with older systems or non-UEFI OS installations. |
| Use Case | For Windows 8/10/11 and modern Linux distributions. | For installing Windows 7, XP, or older Linux distributions. |
| Security | High — blocks untrusted bootloaders. | Low — doesn’t verify boot source. |
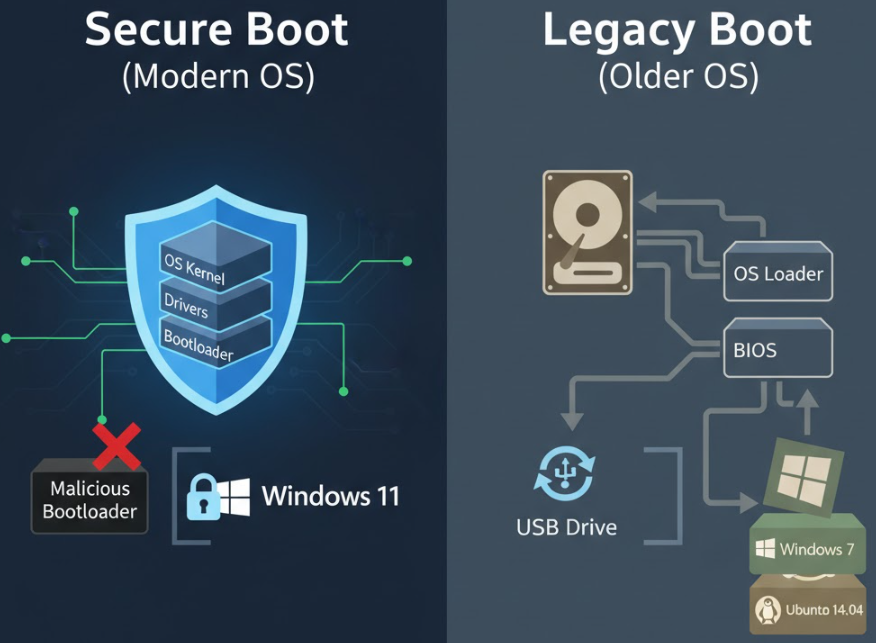
Secure Boot prevents unauthorized software from booting, while Legacy Boot (or CSM mode) allows older hardware and operating systems to function. If you want to enable legacy boot by disabling secure boot, you’ll need to tweak certain BIOS settings.
When Should You Disable Secure Boot?
You should consider Secure Boot disable only when you have a valid reason, such as:
- Installing an older OS: When installing Windows 7 or older Linux versions, Secure Boot can prevent the OS from loading.
- Using Legacy Boot sources: Some USB or DVD installation media don’t support UEFI mode.
- Running third-party hardware or drivers: Certain expansion cards or devices may not be recognized under Secure Boot.
- BIOS troubleshooting: When your system fails to detect boot drives under UEFI, switching to Legacy Mode might fix the issue.
So, understanding How To Disable Secure Boot For Legacy Device Support is crucial for those working with older systems or experimenting with different operating systems.
How To Disable Secure Boot For Legacy Device (Step-by-Step Guide)
Here’s the exact step-by-step method for How To Disable Secure Boot For Legacy Device.
Step 1: Enter the BIOS or UEFI Firmware
- Restart your computer.
- As soon as it powers up, repeatedly press your BIOS key (commonly F2, DEL, ESC, or F10).
- The correct key depends on your motherboard manufacturer. You’ll see a message like “Press F2 to enter setup”.
Once you’re inside the UEFI Firmware settings, you’re ready to move forward.
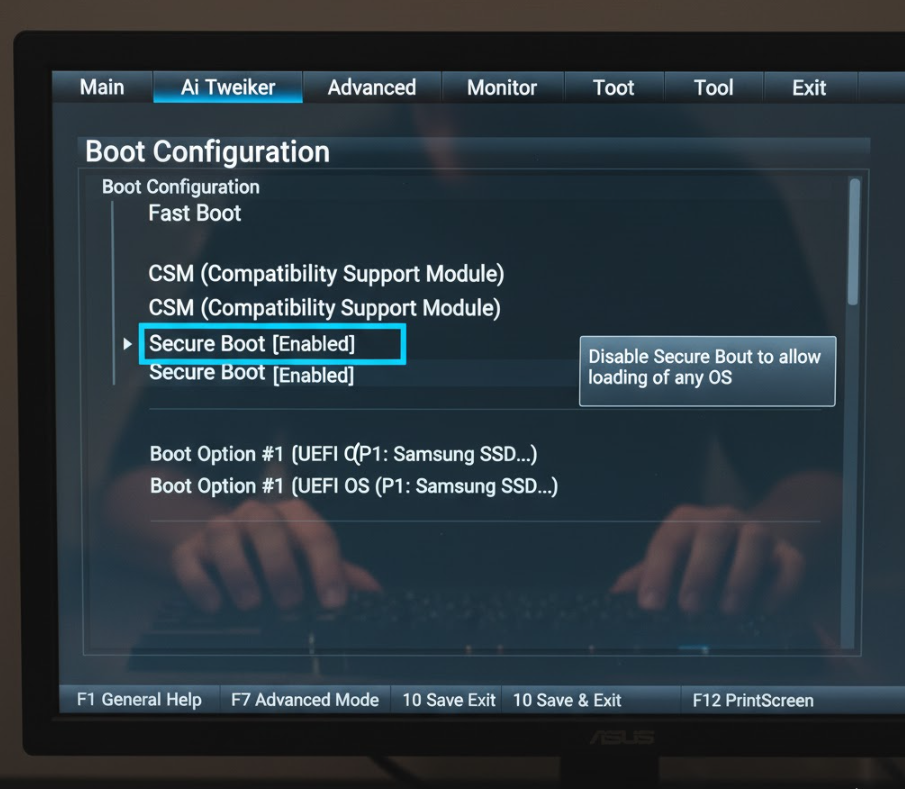
Step 2: Locate Secure Boot in BIOS Settings
- Navigate to the Security or Boot tab using arrow keys.
- Look for an option named Secure Boot, Secure Boot Control, or UEFI Secure Boot.
- The default setting is usually Enabled.
If you can’t see the option, check whether Advanced Mode is available — some motherboards hide these options in the advanced BIOS interface.
Step 3: Disable Secure Boot
- Select Secure Boot and change it from Enabled to Disabled.
- This is often done by pressing Enter or using the +/- keys to toggle the setting.
- Once done, you’ll see Secure Boot disabled legacy mode enabled in the summary screen.
Tip: If your BIOS is password-protected, you might need to enter the BIOS password before making changes.
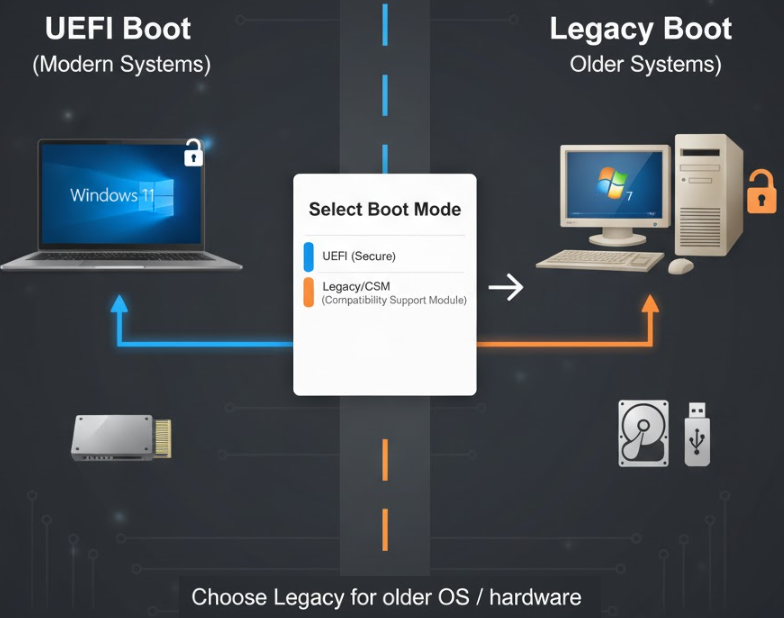
Step 4: Enable Legacy Boot or CSM
After disabling Secure Boot, it’s time to enable Legacy Boot or Compatibility Support Module (CSM).
- Find the Boot Mode or CSM setting.
- Change the option from UEFI to Legacy, or enable CSM Support.
- Save your settings using the F10 key and restart your system.
Your system is now in Legacy Mode, allowing installation of older operating systems or use of Legacy Boot sources like non-UEFI USB drives.
Step 5: Save and Exit BIOS Setup
Once you have changed the Secure Boot and Legacy Boot settings, navigate to the Exit tab.
Choose Save Changes and Exit, then press Enter to confirm. Your computer will restart with Secure Boot disabled and Legacy mode enabled.
BIOS Key Shortcuts by Manufacturer
| Manufacturer | BIOS Key | Boot Menu Key | Notes |
|---|---|---|---|
| Dell | F2 | F12 | Supports both UEFI and Legacy modes. |
| HP | ESC, F10 | F9 | May require password to access BIOS. |
| Lenovo | F1, F2 | F12 | Use Novo button on laptops if F2 doesn’t work. |
| ASUS | DEL, F2 | ESC | Secure Boot under Boot tab. |
| Acer | F2 | F12 | Set Supervisor password to unlock Secure Boot option. |
| MSI | DEL | F11 | CSM and Secure Boot found under Boot settings. |
This table helps you quickly identify how to access your BIOS to perform Secure Boot disable operations efficiently.
What Happens When Secure Boot is Disabled?
Once you turn off Secure Boot for legacy devices, your system will:
- Accept older bootloaders and unsigned OS files.
- Allow installation of older Windows or Linux versions.
- Reduce the risk of boot incompatibility but slightly lower boot security.
| Pros of Disabling Secure Boot | Cons of Disabling Secure Boot |
|---|---|
| Enables installation of old operating systems. | May allow unsigned or malicious software to boot. |
| Helps recognize older hardware and devices. | Reduces firmware-level protection. |
| Provides flexibility for advanced troubleshooting. | Requires careful BIOS management. |
Thus, disabling Secure Boot offers compatibility benefits at the cost of reduced boot security.
How To Install Old OS With Secure Boot Off
Many users disable Secure Boot specifically to install older operating systems. Follow these steps:
- Create a Bootable Drive: Use tools like Rufus to create a bootable USB using Legacy (MBR) partition scheme.
- Disable Secure Boot: As described above.
- Enable Legacy Boot (CSM Enable): Ensure BIOS is set to Legacy or CSM mode.
- Boot from USB/DVD: Choose the legacy device from the boot menu.
- Install OS: Proceed with the installation as usual.
This ensures a smooth setup without Secure Boot interference, helping you successfully install older OS versions.
Troubleshooting Common Issues
If your system doesn’t boot after disabling Secure Boot, here are some quick fixes:
- Recheck Boot Mode: Ensure your OS installation media matches your BIOS mode (Legacy vs. UEFI).
- Reset BIOS Settings: If something goes wrong, you can restore BIOS defaults from the Exit tab.
- BIOS Password Issues: If you can’t access Secure Boot settings, remove or reset the BIOS password.
- Re-enable Secure Boot if Needed: You can always revert settings once your task is complete.
Secure Boot vs Legacy Mode (Quick Comparison)
| Aspect | Secure Boot Enabled | Secure Boot Disabled (Legacy Mode) |
|---|---|---|
| Boot Speed | Fast and optimized. | Slightly slower. |
| Compatibility | New OS only. | Works with old OS and devices. |
| Security Level | High. | Moderate to low. |
| Use Case | Everyday users, secure environments. | Developers, technicians, or retro OS installations. |
This comparison helps you decide whether you should keep Secure Boot off or on depending on your needs.
Precautions Before You Disable Secure Boot
Before implementing How To Disable Secure Boot For Legacy Device, keep these points in mind:
- Backup Data: BIOS changes may sometimes affect boot partitions.
- Understand Boot Modes: Once you switch from UEFI to Legacy, your existing OS might not boot if it was installed in UEFI mode.
- Keep BIOS Updated: An outdated BIOS may not properly support both boot modes.
- Use Verified Installation Media: Always use clean, verified OS images to prevent security issues.
Key Takeaways
- Secure Boot ensures safe and verified boot processes but limits compatibility with older systems.
- Legacy Boot (CSM) allows you to use older operating systems or tools that require MBR partitions.
- The process of How To Disable Secure Boot For Legacy Device mainly involves accessing BIOS settings, turning off Secure Boot, and enabling Legacy Boot mode.
- Always save BIOS changes and test system functionality after modifying these settings.
FAQ: How To Disable Secure Boot For Legacy Device
1. Is it safe to disable Secure Boot?
Yes, it’s generally safe if you know what you’re doing. However, disabling Secure Boot removes firmware-level protection against malicious bootloaders.
2. Can I enable Secure Boot again later?
Absolutely. You can return to BIOS and toggle Secure Boot back to Enabled anytime.
3. Why can’t I find Secure Boot in my BIOS?
Some systems hide it under Advanced Mode or require setting a Supervisor/BIOS password before access.
4. Does disabling Secure Boot affect Windows activation?
No, it doesn’t affect activation or licensing. It only changes how your system boots.
5. What if my system doesn’t boot after disabling Secure Boot?
You may need to switch back to UEFI Firmware or restore BIOS defaults to fix the boot sequence.
Conclusion
Learning How To Disable Secure Boot For Legacy Device gives you full control over your computer’s boot configuration. Whether you’re installing an older OS, experimenting with legacy devices, or troubleshooting BIOS settings, understanding Secure Boot and Legacy Mode can save hours of frustration.
Just remember: Secure Boot disabled legacy mode enabled increases flexibility but reduces boot security — so use it wisely. By following the steps outlined here, you can safely turn off Secure Boot for legacy devices, enable legacy boot, and make your system compatible with a wide range of software and hardware.