How To Change Network Priority On Windows 10. Here, you will read methods to change network priority on Windows 10. If your computer has more than 1 network adapter, then Windows sets the priority value of the each network separately. It is based on the network metric of the adapter. This decides the primary network connection that your PC will use to send and receive networking traffic. You can change the network priority manually.
How To Change Network Priority On Windows 10?
There are two methods to change the network priority. You can do it from the control panel or from the PowerShell.
Method 1 – By Using Control Panel:
To change the order of the network adapters in Windows 10:
1.Press the Windows + I keys to open the Settings app.
2.Select the Network and Internet option.
3.Then click on Status.
4.Locate and select the Change Adapter options.
5.This will launch Network Connections in the Control panel.
6.Right-click on the Wi-Fi adapter, if you want to know how to prioritize Wi-Fi on Windows 10.
7.Select the properties option.
8.In the Networking tab, select the Internet Protocol Version 4 (TCP/IPv4) option.
9.Click on the Properties option.

10.Select the General tab.
11.Click on the Advanced option.
12.Uncheck the Automatic metric box.
13.Enter the priority value in the Interface metric section.
14.Set a lower number to prioritize the adapter more.
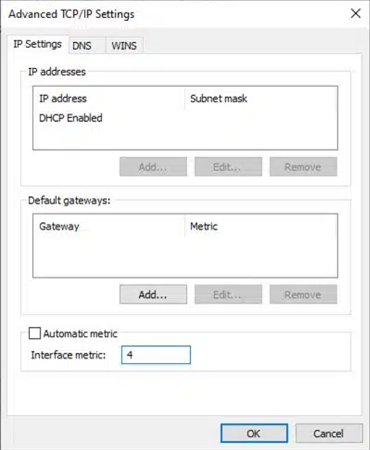
15.Finally, click on OK to save the changes.
16.Now, Windows 10 will prioritize the adapter set by you.
Point To Ponder: If your network setup uses the Internet Protocol Version 6 (TCP/IPv6) and not the usual Internet Protocol Version 4 (TCP/IPv4), then change its metric value from the control panel. Use the same steps above but select the properties of Internet Protocol Version 6 (TCP/IPv6).
Method 2 – By Using PowerShell:
Use the Windows PowerShell to change the network priority of the adapters. Follow the steps:
1.Press Windows + X keys.
2.Select the Window PowerShell (admin) option from the popup menu. This will open PowerShell with administrator privileges on your screen.
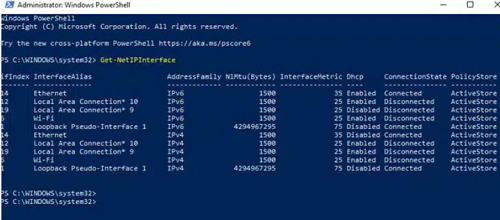
3.Type the Get-NetIPInterface.
4.Press Enter to show the list of the current metric interfaces and index numbers.
5.Now, type the following command for changing the priority order of the network adapter and press Enter.
Set-NetIPInterface -InterfaceIndex 16 -InterfaceMetric 6
6.Change the value of –InterfaceIndex to select the network adapter you want to prioritize.
7.Then, change the value of -InterfaceMetric to assign a priority (as mentioned above, a lower number means higher priority).
8.Type Get-NetIPInterface again.
9.Press Enter to see the new metric list.
10.Close the PowerShell.
Point to ponder: Remember to use the index number of the network adapter you want to change the priority in the –InterfaceIndex commands value.