How to Make an Arduino Screenless Display Project. In an increasingly digitized world, the allure of physical interaction and alternative display methods is growing. The Arduino Screenless Display Project stands at the forefront of this innovation, offering a unique blend of creativity and functionality. This comprehensive guide will walk you through the exciting journey of building your own screenless display using the versatile Arduino platform.
Embracing the Future: What is an Arduino Screenless Display?
An Arduino screenless display isn’t about eliminating information; it’s about transforming how we receive it. Instead of relying on traditional visual screens like LCDs or OLEDs, these projects utilize other senses – touch, sound, or even light patterns – to convey data. Imagine a device that whispers information, vibrates a message, or uses a series of illuminated buttons to guide you. This concept opens doors for innovative applications, especially in accessibility and interactive art. The beauty of how to build Arduino screenless display lies in its flexibility and the vast array of components you can integrate.
Why Choose an Arduino-Based Screenless Display?
The Arduino platform is an ideal choice for Arduino-Based Screenless Displays due to its ease of use, extensive community support, and robust ecosystem of sensors and actuators. Whether you’re a seasoned maker or a beginner, Arduino provides an accessible entry point into complex electronics projects. It allows for rapid prototyping and iteration, making it perfect for experimenting with different output methods. Furthermore, the open-source nature of Arduino means a wealth of libraries and examples are readily available, simplifying the development process.
Planning Your Arduino Screenless Display Project: Initial Considerations
Before diving into the build, careful planning is crucial for a successful Arduino Screenless Display Project. Consider the type of information you want to convey and the most intuitive way to present it without a traditional screen. Are you looking for a simple notification system, a complex interactive interface, or something for blind assistance?
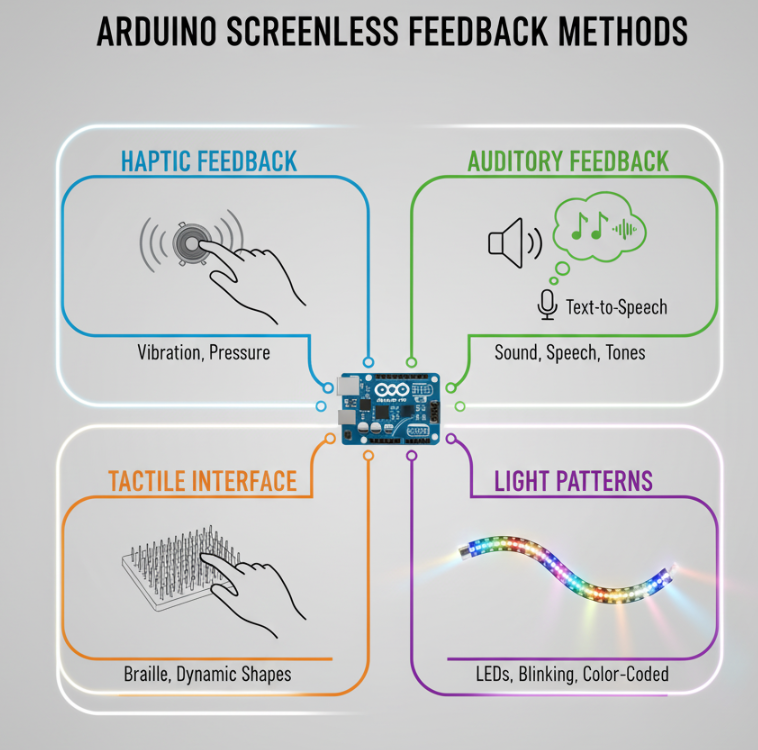
Identifying Your Display Method: More Than Just Pixels
The core of an Arduino screenless display is its output method. Here’s a table outlining popular choices:
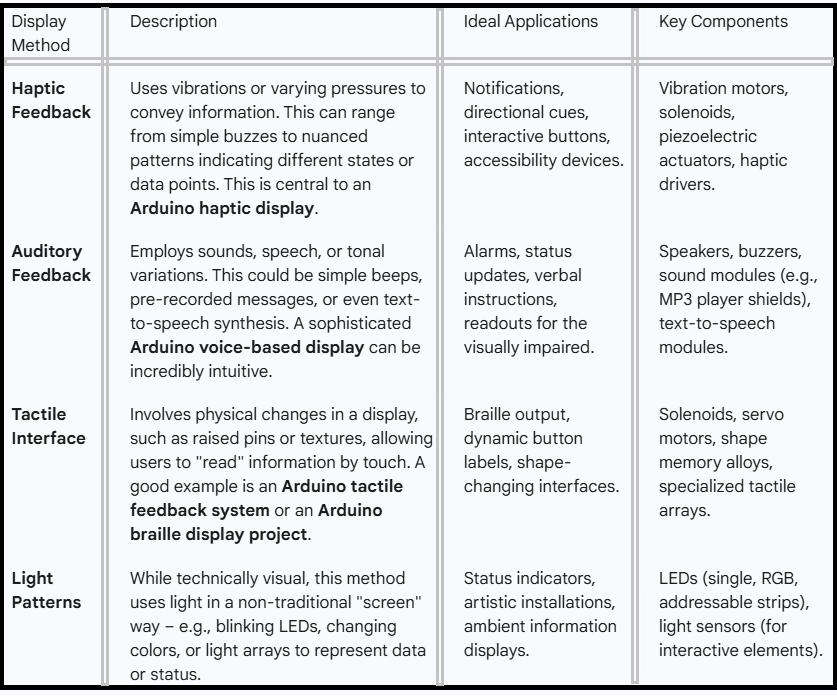
This diverse range highlights the potential for creative and impactful projects. For those interested in accessibility, an Arduino blind assistance project often combines auditory and tactile feedback for a comprehensive experience.
Essential Components for Your DIY Arduino Screenless Display
To embark on your DIY Arduino Screenless Display journey, you’ll need a selection of components. The exact list will vary based on your chosen display method, but here are some common elements:
- Arduino Board: An Arduino Uno, Mega, or ESP32 a popular choices. The Uno is great for beginners, while the Mega offers more pins for complex projects, and the ESP32 includes Wi-Fi and Bluetooth.
- Breadboard and Jumper Wires: Essential for prototyping and connecting components.
- Power Supply: A USB cable connected to your computer or a separate power adapter.
- Output Components:
- Haptic: Vibration motors, motor drivers (e.g., L293D, DRV2605L for advanced haptics).
- Auditory: Small speakers (8 Ohm), audio amplifier module, DFPlayer Mini MP3 module, speech synthesizer module (e.g., Adafruit TReC).
- Tactile: Solenoids, micro servos, push-pull electromagnets.
- Light: Individual LEDs, RGB LEDs, WS2812B addressable LED strips.
- Input Components (Optional, for interactivity): Buttons, switches, potentiometers, sensors (e.g., ultrasonic, temperature, light).
- Enclosure Materials: Cardboard, 3D printed parts, laser-cut acrylic for housing your project.
Understanding the Role of Different Arduino Boards
Choosing the right Arduino board is a critical step in your Arduino Screenless Display Project. Let’s look at a comparison:
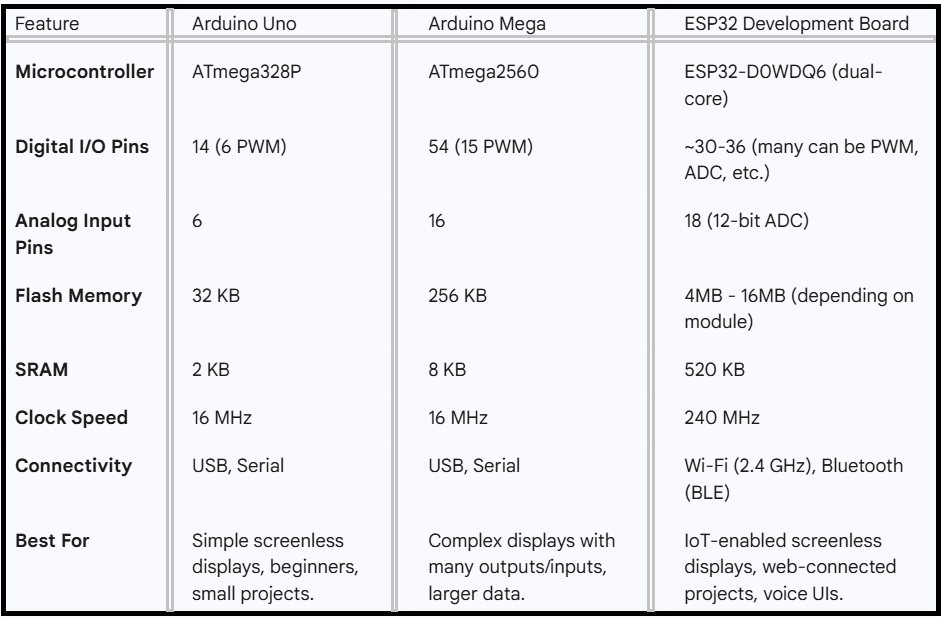
For a basic Arduino text-to-speech display or an Arduino tactile feedback system, an Uno might suffice. If you’re envisioning an Arduino wearable display without screen that needs wireless capabilities, an ESP32 would be a superior choice.
Step-by-Step: Building Your First Arduino Screenless Display Project
Let’s outline a generic approach to building an Arduino Screenless Display Project, focusing on common principles. We’ll consider a simple project: a screenless temperature alert system using LEDs and a buzzer.
1. Define Your Goal and Output Method
Our goal: Create a device that alerts users to temperature changes without an LCD. Output:
- Green LED: Temperature is normal.
- Yellow LED: Temperature is slightly elevated.
- Red LED: Temperature is high, and a buzzer sounds.
2. Gather Components
- Arduino Uno
- Breadboard
- Jumper wires
- LM35 temperature sensor
- 1x Green LED, 1x Yellow LED, 1x Red LED
- 3x 220 Ohm resistors (for LEDs)
- Piezo buzzer
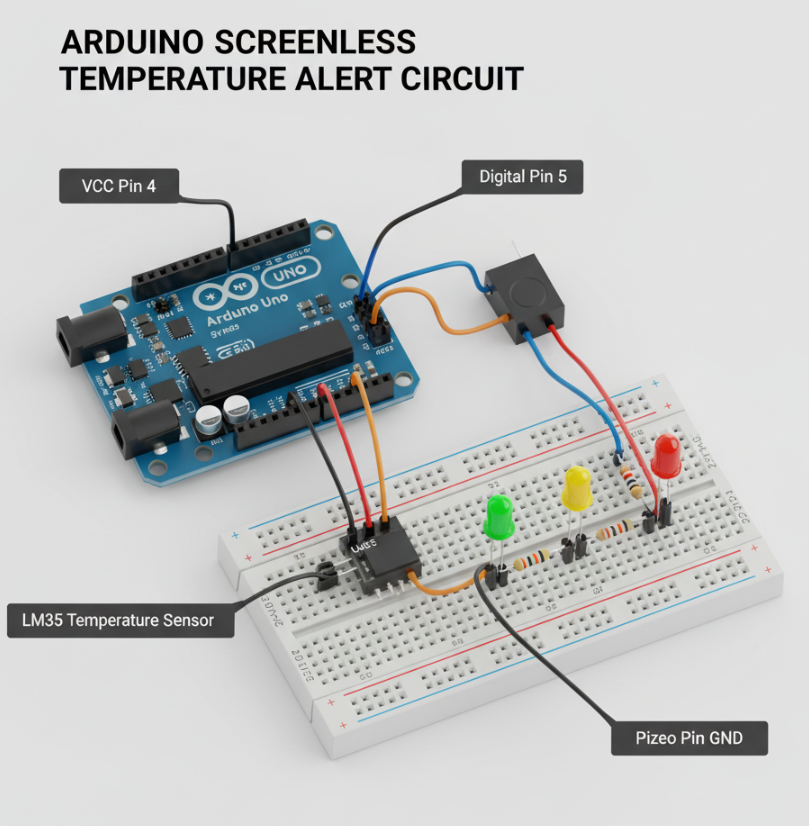
3. Wire Up the Circuit
This is where your Arduino Displays really start to take shape.
- Connect the LM35 sensor: VCC to Arduino 5V, GND to Arduino GND, Signal pin to Arduino Analog Pin A0.
- Connect the LEDs:
- Green LED Anode to Arduino Digital Pin 2 (via 220 Ohm resistor). Cathode to GND.
- Yellow LED Anode to Arduino Digital Pin 3 (via 220 Ohm resistor). Cathode to GND.
- Red LED Anode to Arduino Digital Pin 4 (via 220 Ohm resistor). Cathode to GND.
- Connect the Buzzer: One pin to Arduino Digital Pin 5, other pin to GND.
4. Write the Arduino Code
The code will read the temperature, convert it, and then control the LEDs and buzzer based on defined thresholds. This is a crucial step for your Arduino screenless display.
C++
const int tempSensorPin = A0; // Analog pin for LM35
const int greenLedPin = 2;
const int yellowLedPin = 3;
const int redLedPin = 4;
const int buzzerPin = 5;

// Temperature thresholds in Celsius
const int normalTempMax = 25;
const int elevatedTempMax = 30;

void setup() {
  pinMode(greenLedPin, OUTPUT);
  pinMode(yellowLedPin, OUTPUT);
  pinMode(redLedPin, OUTPUT);
  pinMode(buzzerPin, OUTPUT);
  Serial.begin(9600); // For debugging
}

void loop() {
  // Read analog value from LM35
  int analogValue = analogRead(tempSensorPin);

  // Convert to voltage (assuming 5V reference)
  float voltage = analogValue * (5.0 / 1024.0);

  // Convert voltage to Celsius for LM35
  float celsius = voltage * 100.0;

  Serial.print("Temperature: ");
  Serial.print(celsius);
  Serial.println(" C");

  // Control LEDs and buzzer based on temperature
  if (celsius <= normalTempMax) {
    digitalWrite(greenLedPin, HIGH);
    digitalWrite(yellowLedPin, LOW);
    digitalWrite(redLedPin, LOW);
    noTone(buzzerPin); // Turn off buzzer
  } else if (celsius > normalTempMax && celsius <= elevatedTempMax) {
    digitalWrite(greenLedPin, LOW);
    digitalWrite(yellowLedPin, HIGH);
    digitalWrite(redLedPin, LOW);
    noTone(buzzerPin);
  } else { // celsius > elevatedTempMax
    digitalWrite(greenLedPin, LOW);
    digitalWrite(yellowLedPin, LOW);
    digitalWrite(redLedPin, HIGH);
    tone(buzzerPin, 1000); // Sound buzzer at 1kHz
  }

  delay(1000); // Read temperature every second
}
5. Test and Refine
Upload the code to your Arduino. Observe the LED behavior and buzzer output as you vary the temperature (e.g., by touching the sensor or using a hairdryer carefully). Adjust the thresholds in the code as needed. This iterative process is key to any Arduino Screenless Display Project.
Advanced Concepts and Creative Applications
Beyond simple alerts, an Arduino screenless display can power complex and innovative solutions.
Screenless Display Technology Arduino for Accessibility
For individuals with visual impairments, traditional screens pose a significant barrier. Screenless display technology Arduino offers powerful alternatives. An Arduino braille display project can utilize small solenoids to raise and lower pins, forming Braille characters. Similarly, integrating a text-to-speech module creates an Arduino text-to-speech display that vocalizes information, transforming written content into spoken words. This is a critical area for Arduino blind assistance project.
Wearable and Embedded Screenless Displays
Imagine getting directions not from a map, but from subtle vibrations on your wrist, or knowing your heart rate through a series of gentle taps. An Arduino wearable display without screen can achieve this. These projects leverage the small size and low power consumption of Arduino boards to create unobtrusive feedback systems. This taps into the broader field of Screenless human-computer interface Arduino, pushing the boundaries of how we interact with technology.
Arduino as an Alternative to LCD/OLED
While LCDs and OLEDs are common, an Arduino alternative to LCD/OLED approach can be more power-efficient, robust in harsh environments, or simply offer a more engaging user experience. For example, a screenless display made of physical buttons that light up in sequence can be more durable and tactile than a delicate screen in an industrial setting.
Does Arduino Support AI? Can Arduino Have a GUI?
While Arduino boards themselves are not typically used for heavy AI computations, they can interface with AI-powered systems. For instance, an Arduino could trigger an action based on a voice command processed by a cloud AI service. So, while Does Arduino support AI directly for complex models might be limited, it’s excellent for edge inference or as an endpoint for AI applications.
Regarding Can Arduino have a GUI, traditionally, Arduino doesn’t directly run graphical user interfaces on its own. GUIs are usually handled by more powerful processors (like a Raspberry Pi or a PC) that communicate with the Arduino. However, if you consider a “GUI” as an interactive visual display controlled by Arduino (like a sophisticated LED matrix or a series of physical interactive buttons), then in a broad sense, yes, Arduino can be the brains behind such an interface. For classic screen-based GUIs, you’d typically connect the Arduino to a computer running processing software or a specialized display shield with its own controller.
Can Arduino Run LCD Display?
Yes, absolutely! Can Arduino run LCD display? Arduino boards are commonly used to control various types of LCD and OLED displays. There are many libraries and tutorials available for connecting character LCDs (like 16×2 or 20×4) and graphic LCD/OLED displays (like 128×64 OLEDs) to an Arduino. This is a very popular use case for Arduino, but our focus here is on moving beyond these traditional screens.
Final Touches: Enclosures and Aesthetics
Once your Arduino Screenless Display Project is functional, consider an enclosure. This protects the electronics and gives your project a professional finish. You can use readily available project boxes, 3D print custom designs, or even repurpose household items. Think about how the enclosure interacts with your screenless display – does it highlight the tactile elements, amplify the sound, or diffuse the light effectively?
Frequently Asked Questions (FAQ)
Here are some common questions regarding Arduino Screenless Display Projects:
Q1: What are the main advantages of a screenless display over a traditional screen?
A1: Screenless displays offer advantages in durability, power consumption (often lower), privacy, and accessibility. They can provide more immersive or intuitive feedback by engaging senses other than sight, and can be crucial for users with visual impairments.
Q2: Can I connect my Arduino screenless display to the internet?
A2: Yes, by using an Arduino board with built-in Wi-Fi (like the ESP32) or by adding a Wi-Fi or Ethernet shield to a standard Arduino, you can connect your project to the internet for data retrieval or cloud integration.
Q3: Are there pre-made modules for specific screenless display types?
A3: Absolutely! You can find modules for haptic feedback (e.g., DRV2605L haptic driver), audio playback (e.g., DFPlayer Mini), and text-to-speech synthesis (e.g., various speech synthesizer ICs or modules), significantly simplifying complex implementations.
Q4: How can I make my Arduino screenless display project more interactive?
A4: Incorporate various input sensors! Buttons, potentiometers, touch sensors, gesture sensors, light sensors, or even voice recognition modules can make your project highly interactive, allowing users to control or query the display.
By following this guide, you’re well on your way to creating an impactful and innovative Arduino Screenless Display Project that goes beyond the conventional. Happy making!