How to Reset BIOS Without Removing Battery. Encountering frustrating boot issues, system instability, or forgotten BIOS passwords can bring your productivity to a screeching halt. Often, the solution lies in resetting your system’s BIOS (Basic Input/Output System) or UEFI (Unified Extensible Firmware Interface) settings to their factory defaults. While many guides suggest the traditional method of removing the CMOS battery, this isn’t always convenient or even possible. This comprehensive guide will show you How to Reset BIOS Without Removing Battery, offering multiple practical methods for both desktop and laptop users, ensuring you can troubleshoot effectively and get your system back on track without needing a screwdriver.
Understanding Your BIOS/UEFI and Why a Reset Helps:
Before diving into the “how-to,” let’s quickly recap what the BIOS/UEFI does. It’s the first software that runs when you power on your computer, initializing hardware components and booting your operating system. Over time, custom configurations, failed overclocks, or even malware can corrupt these settings, leading to problems. A reset BIOS without removing battery operation can resolve:
- Boot Failures: When your computer won’t start or gets stuck in a loop.
- Hardware Conflicts: New components not being recognized.
- Overclocking Instability: Reverting to safe speeds.
- Forgotten BIOS Passwords: Though for security, this often requires more robust methods.
How to Reset BIOS Without Removing Battery

This guide focuses on efficient and less intrusive ways to reset BIOS without removing battery.
Method 1: The Onboard Clear CMOS Button (Desktop PCs)
Many modern desktop motherboards are designed with user convenience in mind, featuring a dedicated physical button to clear the CMOS (Complementary Metal-Oxide-Semiconductor) memory. This method is by far the simplest way to reset BIOS using CMOS reset button.
Finding the Button: The Clear CMOS button is typically a small, circular button located either directly on the motherboard itself, often near the PCIe slots or the CMOS battery, or on the rear I/O (Input/Output) panel of your PC case. It might be labeled “CLR_CMOS,” “CMOS Reset,” or a similar abbreviation. Consult your motherboard manual for the exact location.
Step-by-Step Procedure:
- Power Down Completely: Shut down your computer and unplug the power cable from the wall outlet.
- Discharge Residual Power: Press and hold the power button on your PC case for 10-15 seconds. This drains any leftover electrical charge from the system.
- Press the Clear CMOS Button: Locate the button and press it for about 5-10 seconds.
- Restore Power & Test: Plug the power cable back in and power on your computer. Your BIOS settings should now be restored to their factory defaults.
Clear CMOS Button Locations & Appearance
| Location Type | Common Appearance | Identifying Labels |
| On Motherboard | Small, usually black or blue button | CLR_CMOS, RESET, CMOS_SW, JBAT1 (sometimes) |
| Rear I/O Panel | Small button on the back of the PC | CLR_CMOS, BIOS_RESET, Q-Flash Plus (Gigabyte) |
This simple method is an excellent first attempt for anyone wondering how to reset BIOS without removing the CMOS battery.
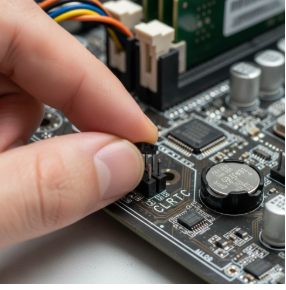
Method 2: Utilizing the CLRTC Jumper or Pins (Desktop PCs)
If your motherboard lacks a dedicated button, it likely features a set of pins, often accompanied by a jumper, designed for clearing the CMOS. This allows you to reset BIOS using jumper pins.
Identifying the Jumper/Pins: Look for a group of two or three small pins on your motherboard, usually near the CMOS battery itself, or sometimes close to the front panel headers. They are typically labeled “CLRTC,” “CLEAR CMOS,” “JBAT1,” “CMOS,” or something similar. Your motherboard manual will confirm the precise location and label.
Procedure for a Three-Pin Jumper:
Complete Power Cycle: Shut down your PC, unplug the power cord, and hold the power button for 10-15 seconds to discharge power.
Locate the Jumper: Find the CLRTC pins. The jumper (a small plastic cap) will usually be covering two of the three pins, typically pins 1 and 2 (the “Normal” operating position).
Move the Jumper: Carefully remove the jumper from its default position and place it onto pins 2 and 3 (the “Clear” position).
Wait: Leave the jumper in the “Clear” position for 5-10 seconds.
Return Jumper: Move the jumper back to its original “Normal” position (pins 1 and 2).
Power On: Plug the power cable back in and start your computer. The BIOS settings will be reset.
Procedure for Two-Pin Jumper/Shorting Pins: If you only find two pins, you’ll need to “short” them.
Power Off & Discharge: Same as step 1 above.
Short the Pins: Use a conductive metal object, like a screwdriver tip, to momentarily touch both pins simultaneously for 5-10 seconds.
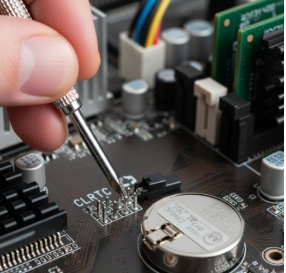
Power On: Remove the screwdriver, plug in the power, and boot your PC.
This method effectively allows you to clear BIOS settings without CMOS battery intervention.
Method 3: Restoring Defaults from Within the BIOS/UEFI Menu
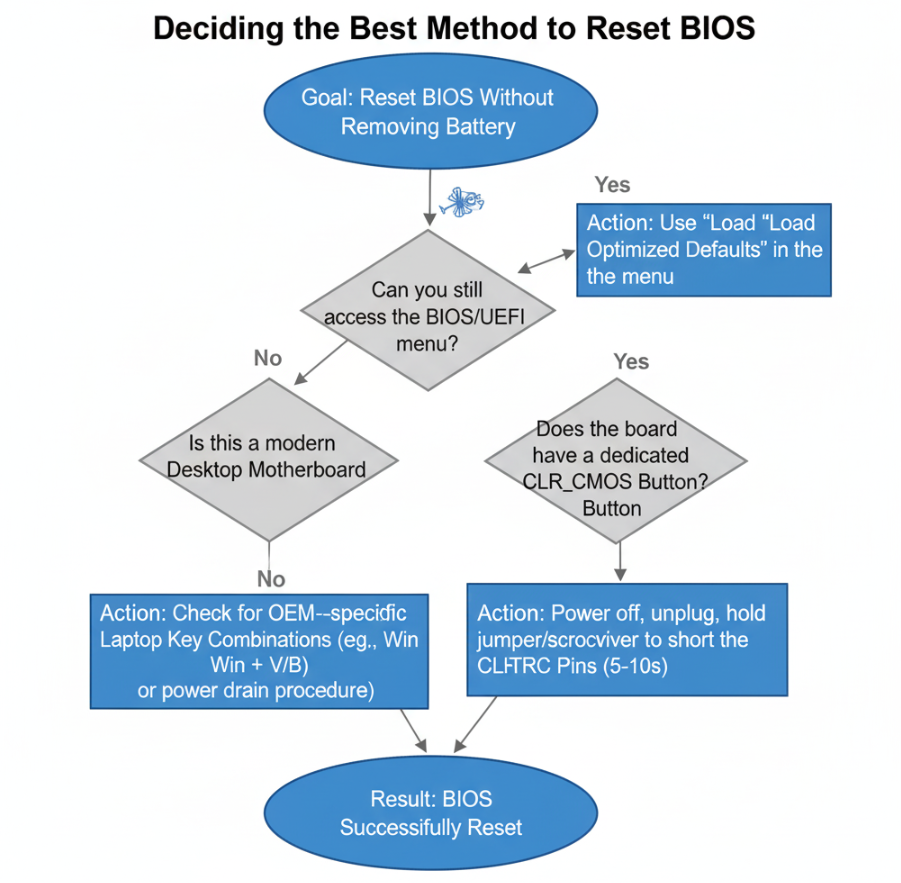
If you can still access your computer’s BIOS or UEFI setup menu, this is the safest and most straightforward way to factory reset BIOS from BIOS menu. This method is universally applicable to both desktops and laptops.
Accessing the BIOS/UEFI Menu:
Restart Your Computer: Initiate a restart.
Press the BIOS Key: As your computer starts up, repeatedly press the designated key to enter the BIOS/UEFI setup. Common keys include F2, F10, Del, Esc, or F1. The correct key is often displayed on the screen during the initial boot sequence.
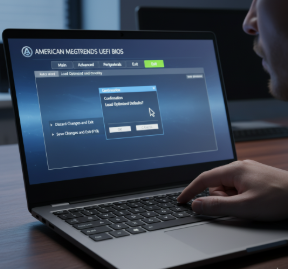
Navigate and Reset: Once in the BIOS/UEFI menu, look for an option like “Load Setup Defaults,” “Load Optimized Defaults,” “Reset to Factory Settings,” or similar phrases. This option is frequently found under the “Exit” tab or a “Save & Exit” section.
Confirm and Save: Select the default option, confirm your choice when prompted, and then choose “Save Changes and Exit” (often by pressing F10). Your computer will restart with the BIOS settings restored.
This method effectively allows you to restore default BIOS settings without any physical interaction with your hardware, making it ideal for laptops or when you don’t want to open your PC case. It also helps you reset UEFI BIOS settings with ease.
Method 4: Specific Laptop Reset Procedures
Laptops often have unique mechanisms for a CMOS reset that don’t involve a physical battery removal or external buttons. These proprietary methods are designed by manufacturers like Dell, HP, and Lenovo. While a universal method for how to reset BIOS without removing battery on all laptops doesn’t exist, here are some common OEM-specific tricks:
- For HP Laptops:
- Power off and disconnect the AC adapter.
- Hold down the Windows key + V key (or sometimes Windows key + B key).
- While holding these keys, reconnect the AC adapter and press the power button for 2-3 seconds.
- Release the keys. You might see a “CMOS Reset” screen or hear a series of beeps.
- For Dell Laptops:
- Power off and disconnect all peripherals and the AC adapter.
- Press and hold the power button for 15-20 seconds to drain any residual power.
- Reconnect the AC adapter and power on. Dell systems often perform an automatic CMOS clear upon detecting a loss of power or certain POST errors.
Always check your specific laptop’s manual for recommended procedures to clear CMOS without opening PC.
Common BIOS/UEFI Access Keys by Manufacturer
| Manufacturer | Common BIOS/UEFI Key(s) |
| Dell | F2, F12 |
| HP | F10, F2, Esc |
| Lenovo | F1, F2, Fn+F2 (laptops) |
| Acer | F2, Del |
| Asus | Del, F2 |
| MSI | Del |
| Gigabyte | Del, F12 |
Method 5: Using System Tools (Limited Effectiveness)
In some rare cases, and for very specific scenarios, you might attempt to restore BIOS defaults from Windows using command-line tools or manufacturer-provided utilities. However, this method is generally not reliable for a full BIOS reset when severe issues prevent boot-up.
- Command Prompt (Not a full BIOS reset): Some advanced users might try to manipulate specific settings via
debugcommands (in older systems) or more modern tools, but these rarely perform a full “clear CMOS” equivalent. This is mostly for specific setting changes, not a full reset. - Manufacturer Utilities: A few OEMs provide Windows-based tools to update BIOS or manage certain settings. While these can alter BIOS configurations, they usually don’t offer a “factory reset” equivalent to the physical methods or the in-BIOS menu option.
For genuine troubleshooting where you need a full reset BIOS without removing battery, stick to the physical methods or the in-BIOS menu options.
Addressing Forgotten BIOS Passwords
A common reason people search for how to reset BIOS without removing battery is a forgotten BIOS password. While resetting the CMOS (using the button or jumper) will typically clear the BIOS password, be aware of a few nuances:
- Modern UEFI Passwords: Some advanced UEFI implementations, particularly in business-class laptops, store passwords in a non-volatile memory that isn’t always cleared by a simple CMOS reset. In these cases, contacting the manufacturer’s support with proof of ownership might be the only solution.
- Hardware-Level Security: Manufacturers like Dell or HP might have robust hardware-level security that requires specific service procedures to reset BIOS password without removing CMOS battery.
Always try the physical CMOS reset methods first if a forgotten password is your primary concern.
Conclusion: Empowering Your Troubleshooting
Knowing How to Reset BIOS Without Removing Battery equips you with crucial troubleshooting skills. Whether you’re dealing with a system that won’t boot, an overclocking experiment gone wrong, or simply need to revert settings to a known good state, these methods offer safe and effective solutions. From dedicated buttons and jumper pins on your motherboard to in-BIOS menu options and specific laptop procedures, there’s usually a way to restore your BIOS to its factory glory without needing to open your PC case or tinker with the CMOS battery. Always consult your specific hardware manual for the most accurate and safe instructions.
Frequently Asked Questions (FAQ)
Q1: Will resetting the BIOS delete my data or operating system? A1: No, resetting the BIOS (or clearing CMOS) only affects the firmware settings. It does not delete your operating system, files, or data stored on your hard drive or SSD.
Q2: What is the difference between BIOS and UEFI? A2: UEFI (Unified Extensible Firmware Interface) is the modern successor to the traditional BIOS. While they both perform similar functions, UEFI offers a more graphical interface, supports larger hard drives (GPT partition tables), faster boot times, and enhanced security features. The term “BIOS reset” is often used broadly to include UEFI resets as well.
Q3: After resetting BIOS, will I need to reconfigure anything? A3: Yes, your BIOS settings will revert to their factory defaults. This means you might need to reconfigure things like:
- Boot order (if you have multiple drives or bootable devices).
- Date and time.
- SATA mode (AHCI, IDE, or RAID), if changed from default.
- Memory XMP profiles or CPU overclocking settings.
Q4: Can I reset the BIOS if my computer won’t even power on? A4: If your computer won’t power on at all (no fans, no lights), a BIOS reset is unlikely to fix the issue, as the problem is usually with the power supply, motherboard, or CPU itself. The CMOS reset methods require some minimal power delivery to the CMOS chip, even if the system isn’t fully booting.