How to Identify Faulty Laptop Components Using Schematics. Laptop repairs often require more than just a screwdriver and guesswork. For in-depth troubleshooting, learning how to identify faulty laptop components using schematics is essential. Schematics are like the roadmaps of a laptop’s internal electronics, showing every connection, power rail, and signal path.
How to Use BoardView for Motherboard Diagnosis
By understanding how to read and understand schematic diagram layouts, you can diagnose issues accurately and avoid replacing parts blindly. This guide will walk you through the fundamentals, from reading schematics to pinpointing exact failures on the motherboard.
Why Schematics Matter in Laptop Repairs:
When a laptop fails to power on or shows abnormal behavior, basic tests may not reveal the root cause. This is where laptop repair schematics come in. A motherboard circuit diagram provides detailed information about component placement, connections, and voltages.
These diagrams allow you to:
-Trace faulty power lines
-Identify burned or shorted components
-Test circuits using test points in laptop motherboard
-Compare expected vs. actual voltage readings
How to Identify Faulty Laptop Components Using Schematics:
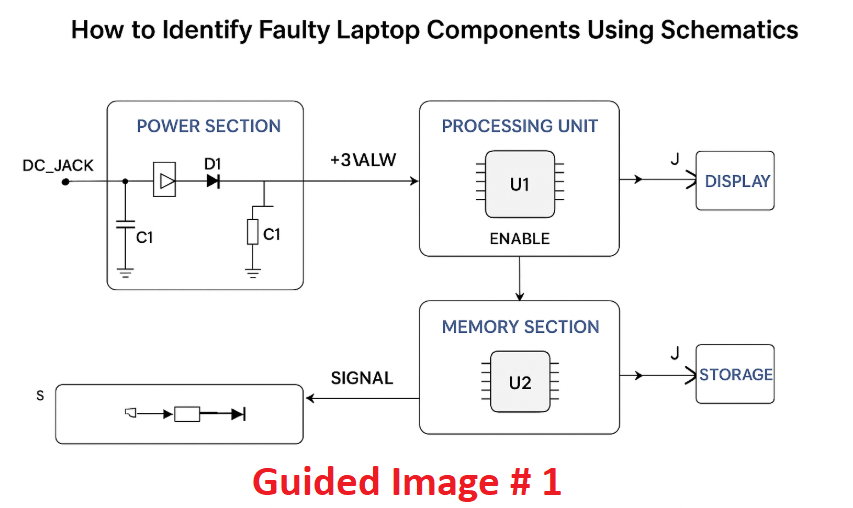
Step 1 – How to Read Laptop Schematics:
Before you can identify a fault, you must know how to read laptop schematics.
Key elements in a schematic diagram include:
Component Symbols – Represent resistors, capacitors, ICs, MOSFETs, and connectors.
Net Names – Labels for specific signals or power rails (e.g., +3VALW for 3V Always).
Test Points – Marked spots to check voltages during laptop motherboard troubleshooting.
Flow Direction – Shows how power or signals move through the circuit.
A proper laptop schematic diagram tutorial will help you recognize these patterns and follow signal flow logically.
Step 2 – Common Laptop Component Failures:
Understanding laptop component failure detection is vital to narrowing down issues. Some frequent culprits include:
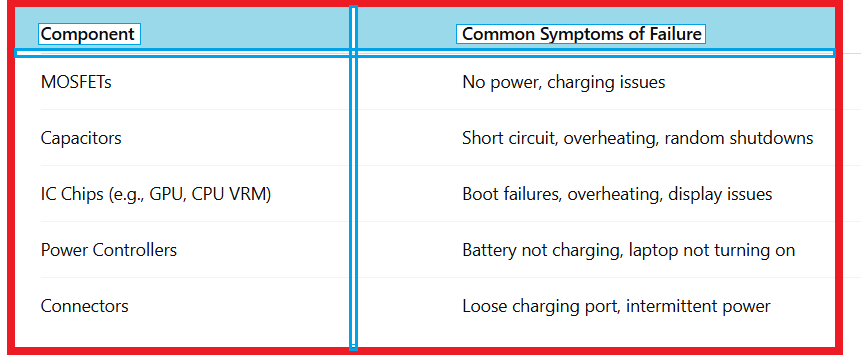
By comparing schematic values with actual readings, you can spot irregularities quickly.
Step 3 – Diagnosing a Dead Laptop Motherboard:
A diagnosing dead laptop motherboard process typically follows these steps:
Visual Inspection – Look for burnt marks, corrosion, or missing components.
Check Power Rails – Use a multimeter to verify +3V, +5V, and CPU core voltage lines.
Follow the Schematic – Trace the faulty line from the power source to the load.
Test Components Individually – Check MOSFET gates, resistor values, and capacitor shorts.
Example: If +3V is missing at a test point, trace the schematic back to the MOSFET supplying it.
Schematic Reading vs. Real-World Diagnosis:

Tools Needed For Laptop Repair:
When working with schematics, you’ll need the right laptop repair tools and techniques for safe and accurate troubleshooting:
Digital Multimeter – For voltage, resistance, and continuity testing.
Power Supply with Current Readout – To check power consumption.
Hot Air Rework Station – For replacing defective ICs and components.
Microscope – For spotting small cracks, cold solder joints, or burnt traces.
Board View Software – Complements schematics by showing actual PCB layout.
Step 5 – How to Check if a Laptop is Defective:
You can use schematics to check if a laptop is defective even before complete disassembly. Steps include:
1.Connect the charger and check for the charging LED.
2.Measure voltage at the DC jack and main power rail.
3.Compare schematic voltages with your readings.
4.Identify where the voltage stops – that’s often where the fault lies.
Step 6 Practice Makes Perfect:
Learning how to read and understand schematic diagram layouts takes time. The more you work on different models, the faster you’ll become at spotting patterns. Combine laptop repair schematics with real-world board inspections to improve your accuracy.

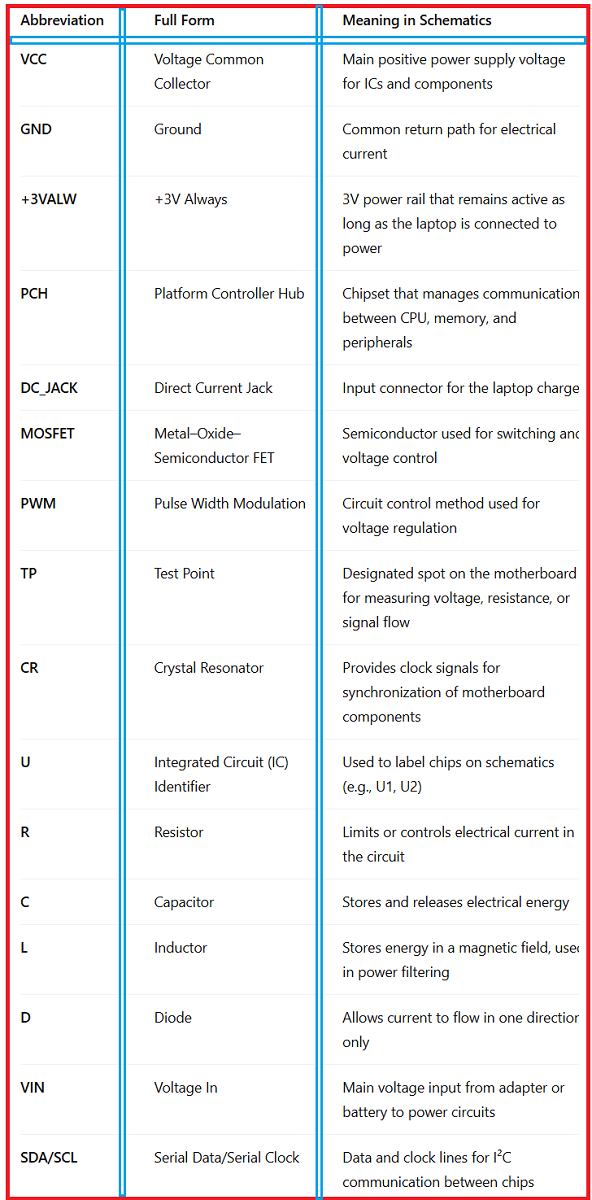
Detailed Schematic Signs And Abbreviations With Their Meanings:
Final Thoughts:
Mastering how to identify faulty laptop components using schematics is a game-changer for any repair technician. With practice, the combination of laptop motherboard troubleshooting skills, motherboard circuit diagram reading, and precise measurement techniques will allow you to fix faults confidently and efficiently.
The more you familiarize yourself with laptop schematic diagram tutorial examples and real boards, the less guesswork you’ll need—and the more laptops you’ll bring back to life.
FAQ – How to Identify Faulty Laptop Components Using Schematics
Q1:Do I need expensive tools to start reading schematics?
No, a good multimeter and access to schematic diagrams are enough for beginners.
Q2:Can I repair a laptop without schematics?
Yes, but it’s harder. Schematics speed up fault detection and reduce trial-and-error.
Q3:Are all laptop schematics available online?
Not always—some manufacturers keep them private, but many can be found through repair communities.
Q4:How long does it take to learn schematic reading?
With consistent practice, you can become proficient in a few months.