How to Fix Windows Automatic Repair Failed : Complete Guide to Restore Your PC. Nothing is more frustrating than turning on your computer only to see Windows stuck in an endless repair cycle. You expect your PC to boot normally, but instead, you’re greeted with messages like “Automatic Repair couldn’t repair your PC.”
If you’ve landed here, don’t panic.
The good news is that most startup repair issues can be fixed without reinstalling Windows. Whether you’re dealing with a Windows 10 Automatic Repair failed error or a Windows 11 Automatic Repair failed situation, this guide walks you through practical solutions that actually work.
In my experience, many users assume their hard drive has died. Surprisingly, that’s often not the case. Corrupted boot files, interrupted updates, or damaged system files are usually the real culprits.
This guide covers proven Windows startup troubleshooting, effective boot recovery solutions, reliable system recovery methods, practical operating system repair techniques, and the use of advanced startup options to get your computer running again.
Why Does Windows Automatic Repair Fail?
Before learning How to Fix Windows Automatic Repair Failed, it’s helpful to understand what causes it.
Common reasons include:
- Corrupted system files
- Damaged Boot Configuration Data (BCD)
- Sudden power outages
- Failed Windows updates
- Bad sectors on storage drives
- Malware infections
- Hardware issues
- Incorrect boot settings
These problems often trigger the dreaded message:
“Automatic Repair couldn’t repair your PC“
Signs That Automatic Repair Has Failed
You may notice symptoms such as:
- Endless repair loops
- Black screens
- Blue screen startup errors
- Repeated restart cycles
- Startup freezing
- Recovery environment prompts
These symptoms indicate that Startup Repair not working in Windows requires manual intervention.
Common Automatic Repair Errors and Their Causes
| Error Message | Possible Cause | Difficulty Level |
|---|---|---|
| Automatic Repair couldn’t repair your PC | Corrupted startup files | Moderate |
| Preparing Automatic Repair loop | Damaged BCD | Moderate |
| Windows failed to start | Missing system files | Easy |
| Blue screen during startup | Driver conflicts | Moderate |
| INACCESSIBLE_BOOT_DEVICE | Disk errors | Advanced |
| Startup Repair couldn’t repair this computer automatically | Boot corruption | Moderate |
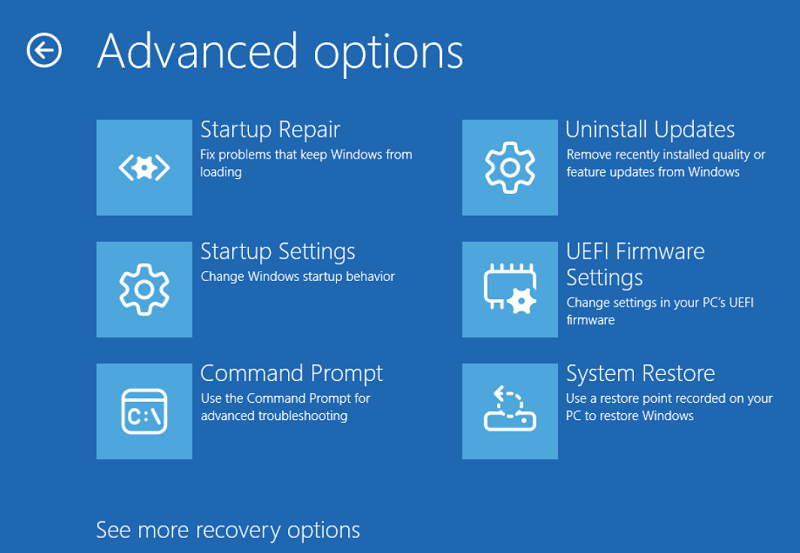
How to Fix Windows Automatic Repair Failed Using Advanced Startup Options
The first method involves entering recovery mode.
Access Windows Recovery Environment
To begin Windows recovery environment troubleshooting:
- Force shut down the PC.
- Restart it.
- Repeat this process three times.
- Windows should launch recovery mode.
- Select:
Troubleshoot → Advanced Options
These advanced startup options provide several repair tools.
Run Startup Repair Again
Although it may sound repetitive, rerunning Startup Repair sometimes works after temporary glitches.
Navigate to:
Advanced Options → Startup Repair
Select your account and enter your password.
If successful, Windows boots normally.
If not, continue with the next solutions.
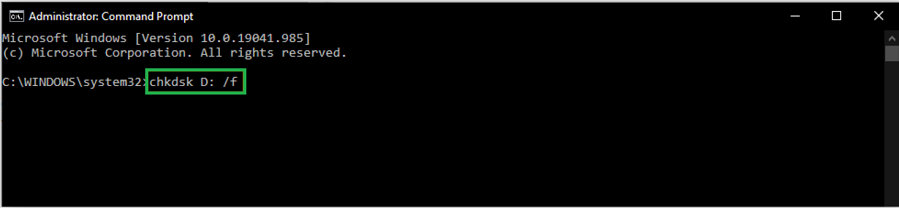
How to Fix Windows Automatic Repair Failed with Command Prompt
One of the most effective fixes is using Command Prompt.
Many technicians rely on this Command Prompt Automatic Repair fix because it directly addresses boot corruption.
Open:
Advanced Options → Command Prompt
Then execute the following commands.
Type:
chkdsk C: /f /r
This scans for bad sectors and repairs file system issues.
If your system drive isn’t C:, replace it accordingly.
This method often helps users repair Windows boot problems caused by disk corruption.
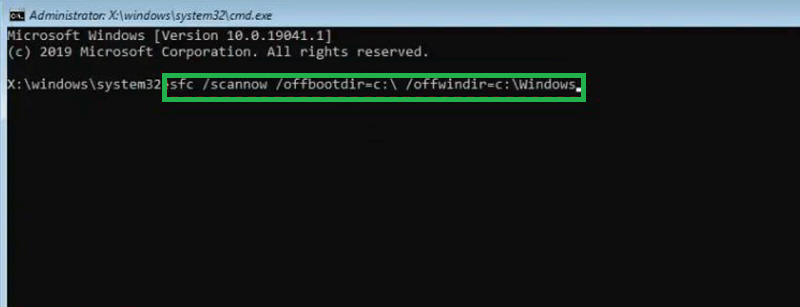
Fix Corrupted System Files
Corrupted Windows files frequently trigger repair failures.
Run:
sfc /scannow /offbootdir=C:\ /offwindir=C:\Windows
This command helps fix corrupted system files Windows depends on during startup.
Be patient. The scan can take time.
Essential Windows Boot Repair Commands
| Command | Function | Purpose |
|---|---|---|
| chkdsk /f /r | Checks disk integrity | Repairs bad sectors |
| sfc /scannow | Verifies system files | Restores damaged files |
| bootrec /fixmbr | Repairs Master Boot Record | Fixes boot failures |
| bootrec /fixboot | Writes new boot sector | Restores startup |
| bootrec /scanos | Finds Windows installations | Detects OS copies |
| bootrec /rebuildbcd | Rebuilds BCD | Fixes startup entries |
How to Fix Windows Automatic Repair Failed by Rebuilding BCD
One major reason users experience the Windows Automatic Repair loop fix issue is damaged boot configuration data.
If you’re wondering how to rebuild BCD in Windows, follow these steps.
Open Command Prompt and type:
bootrec /fixmbr
Press Enter.
Then run:
bootrec /fixboot
Next:
bootrec /scanos
Finally:
bootrec /rebuildbcd
This sequence helps fix boot configuration data (BCD) errors and restore startup functionality.
Many users report that rebuilding BCD immediately resolves the issue.
Use System Restore
If Automatic Repair started failing after updates or software installations, System Restore may help.
Go to:
Advanced Options → System Restore
Choose a restore point created before the problem appeared.
This process can often restore Windows after startup failure without affecting personal files.
Uninstall Recent Updates
Occasionally, problematic updates break startup processes.
Navigate to:
Advanced Options → Uninstall Updates
You’ll see two choices:
- Uninstall latest quality update
- Uninstall latest feature update
Start with the quality update first.
This method is particularly useful if Windows 11 Automatic Repair failed immediately after Patch Tuesday updates.
Disable Early Launch Anti-Malware Protection
Rarely, security components interfere with startup.
Go to:
Startup Settings → Restart
Press:
8 – Disable Early Launch Anti-Malware Protection
Restart and test the system.
Which Solution Should You Try First?
| Scenario | Recommended Fix | Success Rate |
|---|---|---|
| Endless repair loop | Rebuild BCD | High |
| Blue screen startup | System Restore | High |
| Disk-related errors | CHKDSK Scan | High |
| Corrupted files | SFC Scan | Moderate |
| Update-related issue | Uninstall Updates | High |
| Unknown cause | Startup Repair | Moderate |
How to Fix Windows Automatic Repair Failed on Windows 10 and Windows 11
Although the repair process is similar, there are subtle differences.
Windows 10 Automatic Repair Failed
Common causes include:
- Corrupted updates
- Legacy boot configuration issues
- Driver conflicts
Recommended fixes:
- Run CHKDSK
- Rebuild BCD
- Use System Restore
Windows 11 Automatic Repair Failed
Typical causes include:
- Interrupted cumulative updates
- TPM-related boot complications
- UEFI configuration problems
Recommended fixes:
- Remove recent updates
- Run SFC scans
- Rebuild startup entries
From practical observation, both operating systems respond well to these boot recovery solutions.
Resolve Blue Screen Automatic Repair Error
Sometimes Automatic Repair leads directly to a BSOD.
To resolve blue screen Automatic Repair error, try:
- Disconnecting external devices
- Running memory diagnostics
- Updating BIOS (carefully)
- Using System Restore
- Performing Safe Mode troubleshooting
These approaches form part of effective operating system repair techniques used by professionals.
Last Resort: Reset Your PC
If everything else fails, resetting Windows may be necessary.
Navigate to:
Troubleshoot → Reset This PC
Choose:
Keep My Files
Removes apps while preserving personal data.
Remove Everything
Performs a complete reset.
Use this option only after exhausting other system recovery methods.
Prevent Automatic Repair Problems in the Future
Nobody wants to repeat this experience.
To reduce future startup issues:
- Keep Windows updated.
- Avoid forced shutdowns.
- Use a UPS during power outages.
- Create restore points regularly.
- Scan for malware.
- Monitor hard drive health.
- Back up important files.
Simple habits go a long way.
Conclusion
Learning How to Fix Windows Automatic Repair Failed can save hours of frustration and potentially prevent unnecessary operating system reinstalls.
In most cases, startup issues stem from damaged boot records, corrupted system files, or problematic updates rather than catastrophic hardware failure. By using Windows startup troubleshooting, practical boot recovery solutions, trusted system recovery methods, and proven operating system repair techniques, you can often restore a non-booting PC within an hour.
While technology continues evolving through trends like freelancer efficiency solutions, artificial intelligence for remote work, digital workflow optimization, automated business processes, and productivity enhancement technology, one truth remains unchanged: understanding basic troubleshooting skills empowers users to solve problems confidently.
The next time you encounter Automatic Repair couldn’t repair your PC, you’ll know exactly what to do.
Frequently Asked Questions
1. What causes Automatic Repair couldn’t repair your PC?
Usually corrupted system files, damaged BCD entries, failed updates, or disk errors trigger the problem.
2. Can I fix Windows Automatic Repair without reinstalling Windows?
Yes. Methods such as Startup Repair, CHKDSK, SFC scans, rebuilding BCD, and System Restore often solve the issue.
3. Is rebuilding BCD safe?
Yes. It simply recreates boot configuration entries and is widely used to repair startup failures.
4. Does Automatic Repair mean my hard drive is failing?
Not necessarily. Although disk issues can contribute, software corruption is a much more common cause.
5. What should I do if none of these methods work?
Back up important files if possible and use “Reset This PC” or perform a clean Windows installation.