Turn Off Chrome Auto Update In Windows 10. Here, we will discuss how to turn off Chrome auto update in Windows 10. Chrome is the most used browser all around the world. It has millions of users.
Google keeps updating its browser to keep the browsing safe. But, sometimes updating the browser can cause changes in functionalities that are not up to the mark or they are of no use for you. To solve this problem, you can stop updating the chrome and update it manually, whenever there is a need.
How To Turn Off Chrome Auto Update In Windows 10?
If you want to disable the Google Chrome update, here I have mentioned some of the methods to turn off the Chrome auto update.
Method 1 – Rename The Chrome Update File:
The process of auto-updating is performed by the Google update application. To stop Chrome from updating automatically, you have to rename the Google Update application to the Chrome folder. This will create an error, whenever Chrome tries to update the browser. To do so:
1.Press the Windows + E keys to open the Windows Explorer.
2.Navigate to the following location:
C:\Program Files(x86)\Google\, where C is the system drive.
3.Open the Update folder.
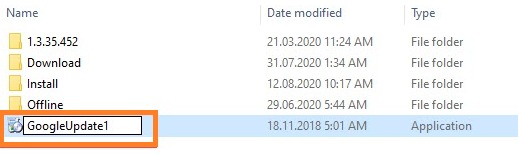
4.Right-click on the GoogleUpdate application.
5.Select the Rename option.
6.Rename it to GoogleUpdate1.
7.Now, open Chrome and type the following address and press Enter:
chrome://settings/help
8.Now, you will see an error that stops Chrome from checking for updates.
Method 2 – Disable Chrome Auto Update Form Registry Editor:
If you want to stop Chrome from updating automatically, just change the various Registry Keys. It can be a little risky, as all the Windows are saved there. You should back up the registry key before trying this method. To disable chrome updates from the registry editor:
1.Open the Run utility again.
2.Type regedit and press Enter to open the Registry Editor.
3.Navigate to the following key:
Computer\HKEY_LOCAL_MACHINE\SOFTWARE\Policies
4.Right-click on the Policies key.
5.Select the New option to create a new subkey. Name the new subkey Google.

6.Then, right-click on the Google key and create another subkey. Name it Update.
7.Select the Update key and right-click on the white part of the right panel.
8.Select New>DWORD (32-bit) Value.
9.Name the new value UpdateDefault.
10.Double-click on it and set the value 0.
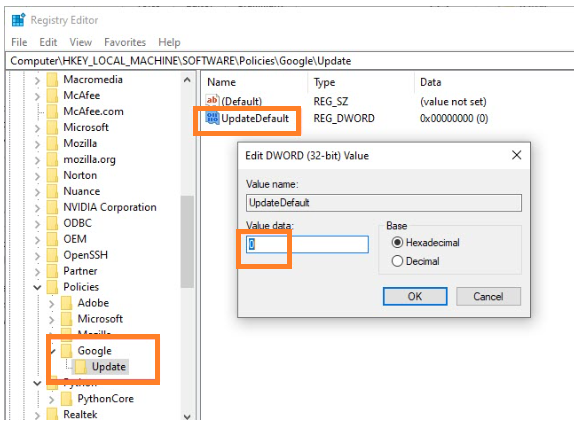
11.Click on Ok to save the changes.
12.Close the Registry Editor. This will disable the chrome auto update feature.
Method 3 – Disable Chrome Auto Update From Windows System Configuration:
You can also stop the updates from the Windows System Configuration. Follow the below-given steps:
1.Press the Windows + R keys to open the Run utility.
2.Type msconfig.
3.Press Enter to open the System Configuration dialog.
4.Locate and uncheck the Google Update Service (gupdate) and Google Update Service (gupdatem) boxes from the services list.
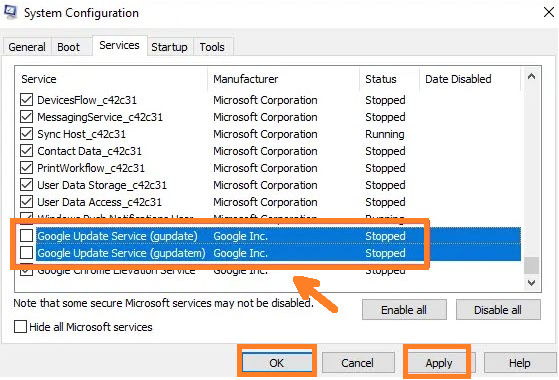
5.Click on Apply and OK to save the changes.
6.Restart your computer.
This method will surely turn off the Chrome auto update.