SMD Testing Guide for Laptop Motherboard Repair. In modern electronics, Surface Mount Devices (SMDs) dominate circuit boards, especially in laptops. When a laptop fails to boot or shows power issues, faulty SMD components are often to blame. This SMD Testing Guide for Laptop Motherboard Repair is your step-by-step resource for diagnosing and testing these tiny yet crucial components using basic tools, such as a digital multimeter.
KBC IC Troubleshooting For Laptop Repair
What is SMD and Why It Matters?
SMD stands for Surface Mount Device. It is a type of electronic component mounted directly onto a PCB (Printed Circuit Board). Unlike traditional through-hole parts, SMDs are compact and soldered on both sides of the board. Their compact size allows for more complex and powerful motherboard designs in laptops.
Since SMDs are responsible for critical functions like power regulation, signal amplification, and voltage control, identifying faulty parts is essential for effective laptop motherboard diagnostics.
SMD Testing Guide for Laptop Motherboard Repair: What You Need
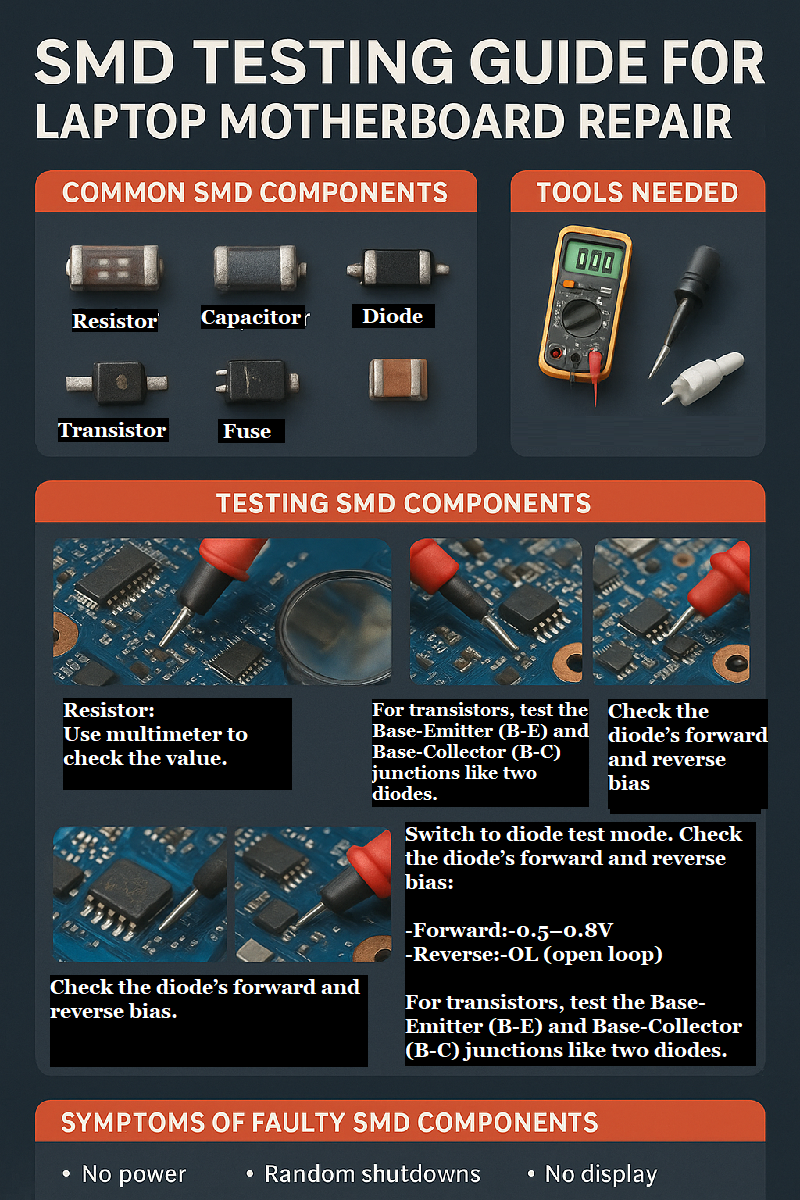
To begin testing SMD components on laptop motherboards, you need a few tools:
-Digital Multimeter (with diode, resistance, and continuity modes)
-Magnifying Glass or Microscope
-PCB schematic (optional but helpful)
-Steady hand and patience
Many laptop issues such as “no power,” “no display,” or “random shutdowns”, can be traced back to damaged SMD components.
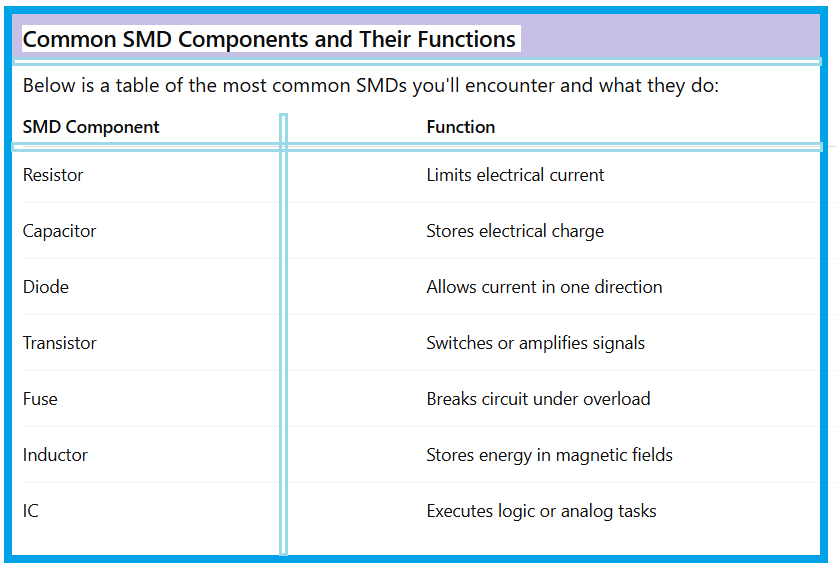
Common SMD Components and Their Functions:
Below is a table of the most common SMDs you’ll encounter and what they do:
How to Test SMD Components on a Circuit Board:
Let’s dive into actual SMD testing techniques for beginners. Below are common components and how to check them:
1.Testing SMD Resistors:
Set your multimeter to resistance (Ω) mode. Touch both ends of the SMD resistor. A good resistor will show a value close to its rated resistance. If it reads open or zero, it’s likely faulty.
2.How to Test SMD Capacitors:
Capacitors can be tricky. Use capacitance mode, or diode mode if your multimeter lacks one. Place probes across the terminals:
-A good cap will show an increasing reading (charging).
-A dead short indicates a faulty capacitor.
3.SMD Diode and Transistor Testing:
Switch to diode test mode. Check the diode’s forward and reverse bias:
-Forward:-0.5–0.8V
-Reverse:-OL (open loop)
For transistors, test the Base-Emitter (B-E) and Base-Collector (B-C) junctions like two diodes.
4.SMD Fuse Testing in Laptop Motherboards:
To learn how to check an SMD fuse using a multimeter in a laptop motherboard, switch to continuity mode. A working fuse will beep. No sound? Replace it.
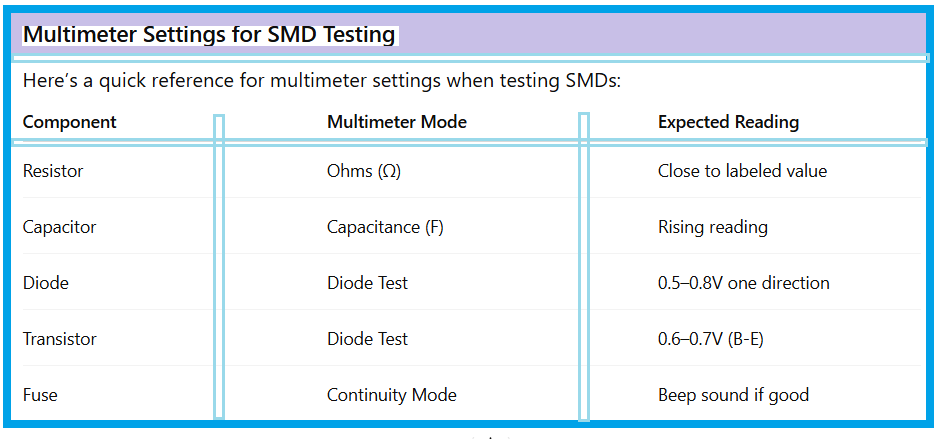
Multimeter Settings for SMD Testing:
Here’s a quick reference for multimeter settings when testing SMDs:
Common Symptoms of Faulty SMD Components:
Many common SMD problems in laptops are easy to spot once you know the signs:
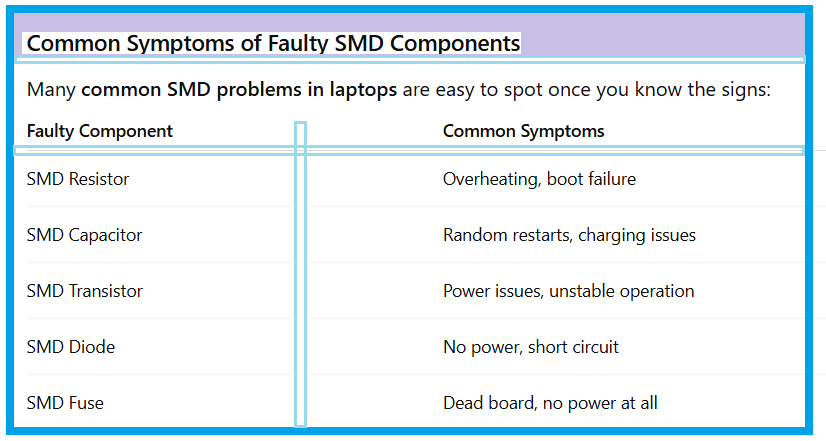
If your laptop exhibits these symptoms, start testing the related SMD areas.
Advanced SMD Testing Tips:
-Use BIOS chip SMD testing if your laptop powers on with no display.
-Always refer to the laptop motherboard components list to identify unknown SMDs.
-Learn to test ICs on the motherboard using datasheets and diode mode.
-For laptop no power SMD issues, always start with the power rail near the charging IC.
Identify and Replace: What to Do Next
Once a faulty component is confirmed:
1.Mark or take a photo for reference.
2.Use hot air rework station or a soldering iron to remove it.
3.Replace with a component of the same rating.
4.Re-test the board before full reassembly.
5.Always double-check using the schematic diagram or known-good board comparisons.
Why a Good Multimeter Matters:
Using a digital multimeter for SMD testing ensures accurate diagnostics. Cheap models might not detect subtle faults, especially in testing SMD transistors or capacitors.
Conclusion:
This SMD Testing Guide for Laptop Motherboard Repair provides a reliable starting point for chip-level diagnostics. Whether you’re learning how to test SMD components with a multimeter or diagnosing deeper electronics repair for laptops, knowing what to look for and how to test it is critical.
By combining the right tools, techniques, and diagnostic logic, you can confidently restore faulty laptops and increase your success in board-level repairs.
FAQ – SMD Testing Guide for Laptop Motherboard Repair
Q1:Can I test SMD components without removing them from the board?
Yes, in most cases. Ensure power is disconnected and test in-circuit using proper multimeter modes.
Q2:How do I identify unknown SMD components?
Use a magnifier and look up codes in online SMD codebooks or compare them to schematics.
Q3:Is it necessary to have a schematic for testing?
Not mandatory, but highly recommended for tracing signals and component values.
Q4:What’s the best multimeter setting for beginners?
Use continuity and diode test modes—these are safest and most revealing for SMD testing.