Calibrate Laptop Screen On Windows 10. In this article, you will come up with How to Calibrate Your Monitor in Windows 10 easily. If you want to see the full potential of your display, there is a need to calibrate your laptop screens. Have you ever thought that despite having a high-end display why your screen looks so dull? This is because of the default settings of WIndows of running the default colour combination. So, it is very important to calibrate your monitor.
How To Calibrate Laptop Screen On Windows 10 Easily?
To calibrate your screen, just follow the following steps:
Desktop Screen Should Be In Recommended Resolution:
The very first thing you have to check in calibrating the screen is if your desktop resolution is set to the recommended resolution of your monitor or not. To check this, follow the below-given steps.
1.Right-Click on your desktop. A pop-up menu will appear, click on the Display settings.
2.Scroll down to the Scale and Layout section.
3.Check if the resolution is set to the recommended value.
4.If not, then select the recommended value.
Steps To Calibrate Monitor Screen On Windows 10
After setting the screen to recommended resolution, now it’s time to start the Windows 10 colour calibration utility. Just follow the following steps:
1.Right-click on your desktop screen.
2.Click and open the Display settings.
3.Scroll down a little and click on the Advanced Display Settings option.
4.Now you will see Display adaptor properties for Display 1 at the bottom. Click it.
5.The Generic PnP Monitor and Microsoft Basic Display Adaptor Properties box will open.
6.Now first select the Color Management tap on the top and then the Color Management option.
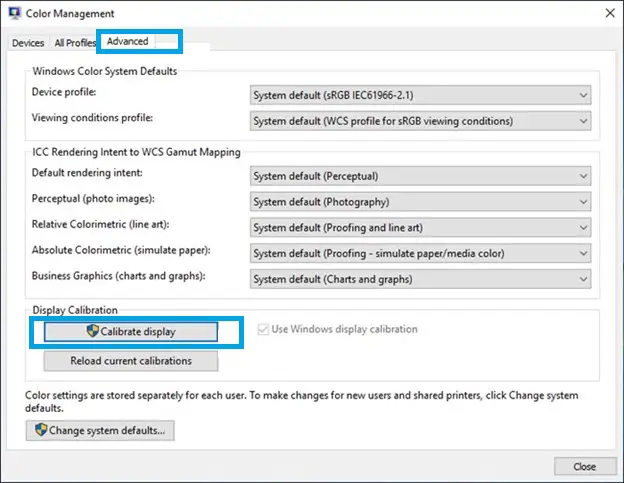
7.Then select the Advanced tab and click on the Calibrate Display option.
8.The Display Color Calibration wizard will show on the screen. Click Next to the start the process.
9.Now, adjust the Gamma settings of your screen. You will see black dots on the screen and a slider at the side. Move the slider up and down till the black dots are barely visible. Then, click Next.
10.Next step is to adjust the brightness. Open brightness control option of the laptop. You have to adjust the brightness until you distinguish the shirt from the suit with the X barely visible in the photo. Click Next.
11.Now, adjust the contrast of your screen by locating the contrast setting on your laptop. You have to adjust the contrast till the wrinkles and buttons on the white shirt disappear. Then, click Next.
12.In the next step, you have to adjust the color balance by adjusting the red blue green sliders. Do this until the color cast is removed from graya bars. Do this by using the RGB color balance controls of the laptop. Click Next.
13.The calibration of your laptop has been finished. Compare this one with previous. After your satisfaction, click on the Finish button to end the calibration session.
Also check: What Is IsDone.dll Error And How To Fix It
 Lab-One Laptop Chip Level Repairing & Laptop Bios Bin File


