Disable Slow Charging Notification In Windows 10. This article teaches how to disable slow charging notification in Windows 10. Here, I will discuss two methods to disable the slow charging notification.
Are you receiving the “Slow charging” notification on Windows 10. This indicates that the charging speed is slower than the required charging speed of your Pc. This issue is more common with USB-C cables. By disabling the slow charging notification, you can speed up the charging.
A damaged cable can also be the cause of the slow charge notification. So, if you will not change the cable, it will cause damage to your system. It is better to change the cable as soon as possible. Until then, follow the methods to disable the slow charging notification.
How To Disable Slow Charging Notification In Windows 10:
Method 1 – Disable From The Settings App:
To disable the battery charging Windows 10 notifications using the Settings app, follow the steps given below:
1.Press the Windows + I key to open the Settings app.
2.Click on the Devices option.
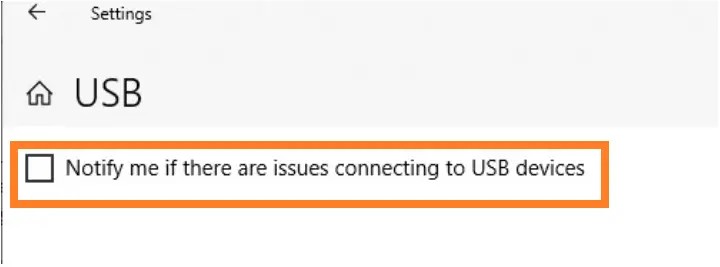
3.Next, select the USB option from the left pane.
4.Now, uncheck the Notify me if my PC is charging slowly over USB box.
Method 2 – Disable From The Registry Key:
By modifying the registry key, you can disable the slow charging notification: To do so:
1.Press the Windows + R keys to launch the Run utility.
2.Type regedit in the search bar.
3.Press Enter to open the Registry Editor.

4.Navigate to the following location:
HKEY_CURRENT_USER\SOFTWARE\Microsoft\Shell\USB
5.Now, right-click on the white part of the right pane.
6.Then select the New option and click on the DWORD (32-bit) value option to create a new DWORD.
7.Rename the DWORD to NotifyOnWeakCharger.
8.Double-click on the DWORD and enter 0 in the Value data section.
9.Setting the value to 0 disables the notification and setting it to 1 enables it.

10.At the end, click on OK to save the changes in the DWORD.
featured image source: https://www.theengineer.co.uk/